While you start *Tower Blitz* with just one tower type at your disposal, the game gradually introduces a wide variety of towers—each with its own unique strengths and weaknesses. Choosing the right one for your strategy can make all the difference. **To help you make the best decisions, here's our complete tier list of all towers in *Tower Blitz*, ranked from S-Tier to D-Tier.**
Recommended Videos
Table of Contents
- All Towers In Tower Blitz Ranked
- S-Tier Towers
- A-Tier Towers
- B-Tier Towers
- C-Tier Towers
- D-Tier Towers
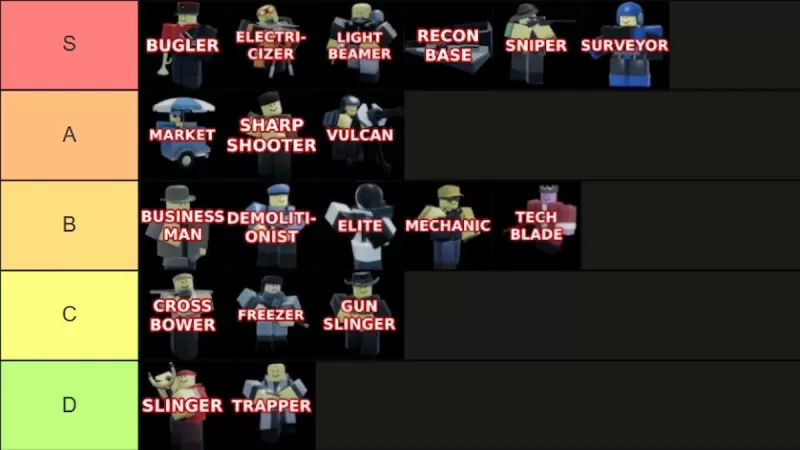
Image by The Escapist. We've ranked every tower in Tower Blitz from S-Tier to D-Tier, based on their abilities, upgrade paths, cost efficiency, and overall performance. S-Tier towers are the most powerful and can carry you through even the toughest maps when used correctly. A-Tier towers are still strong but come with certain limitations. B-Tier towers are average performers—neither exceptional nor completely useless. C-Tier towers tend to underperform, though skilled players may find niche uses for them. Finally, D-Tier towers are largely ineffective and should be avoided unless absolutely necessary.
S-Tier Towers
| Tower | Cost | Explanation | Pros and Cons |
|---|
 | To unlock: 2500 Tokens (available at Level 25)
To place: 750 Cash | An incredibly powerful support tower. It boosts the performance of all other towers significantly and is practically essential in Expert mode. Just note that it doesn’t buff Recon Bases. | + Significantly enhances other towers
+ Essential in Expert
– Support-only function |
 | To unlock: 5500 Tokens
To place: 3800 Cash | This tower delivers the highest damage and range in the game. Position it near the end of the path to maximize its effectiveness against incoming enemies. | + Massive damage and range
+ Combines support and offense
– Very expensive |
 | To unlock: Complete the Contract
To place: 1800 Cash | One of the strongest towers available. Place it facing a straight section of the enemy path for optimal crowd control. Both upgrade paths are excellent. | + Extremely powerful
+ Excellent area control
– Not viable early-game
– Costly |
 | To unlock: 8000 Tokens (available at Level 45)
To place: 1000 Cash | Spawns operatives that fight alongside you. Upgrading increases their power. The top path is slightly preferred, but both are highly effective, especially in Expert difficulty. | + Continuously spawns units
+ Strong upgrade paths
– Expensive upgrades |
 | To unlock: 1500 Tokens
To place: 500 Cash | The top choice for early-game defense. While some consider it slow, this can be mitigated by choosing the bottom upgrade path. Remains useful well into mid and late-game, especially on Expert. | + Best early-game tower
+ Effective throughout gameplay
+ High piercing damage
– Relatively slow fire rate |
 | To unlock: Complete the Contract
To place: 700 Cash | Highly versatile tower that can serve as either support or offense depending on your chosen path. Useful from beginning to end. | + Flexible role options
+ Long-term usability
– Max of four allowed per map |
A-Tier Towers
| Tower | Cost | Explanation | Pros and Cons |
|---|
 | To unlock: 1000 Tokens
To place: 650 Cash | A solid money-generating tower. Stick to the top path for maximum profit. While less effective early on, it becomes crucial later in the game, especially in multiplayer. | + Valuable in all modes, especially multiplayer
+ Profitable over time
– Bottom path lacks value
– Slow initial returns |
 | To unlock: 1300 Tokens
To place: 600 Cash | Excellent for dealing with large groups of enemies early on. Its
 LATEST ARTICLES
![]()
With both director Danny Boyle and writer Alex Garland reuniting for the infected universe, continuing the 28 Days Later franchise they launched over two decades ago with 28 Years Later, we're exploring cinema's greatest apocalyptic visions.Or perhap
Author: HunterReading:3
![]()
A Few Good Men, This Is Spinal Tap, and The Princess Bride director Rob Reiner has been found deceased in his Brentwood, Los Angeles home, along with his wife, Michele. He was 78. CNN has reported that the LAPD is investigating the incident as an app
Author: HunterReading:7
![]()
All major summer gaming showcases have concluded, giving us a solid idea of the games we'll be playing over the coming year. Throughout IGN's Summer of Gaming, we witnessed numerous thrilling reveals. These ranged from the debut of Resident Evil Requ
Author: HunterReading:8

Supercell unveils its latest MMORPG, mo.co, now available in a limited Android soft launch, requiring an exclusive invite to access the monster-hunting adventure.How to Join the Hunt?Supercell’s launc
Author: HunterReading:10
|